Deer and Doe Sirocco - the jumpsuit adventure
I did the size 42 with a small adjustment to lengthen the bodice by 1 inch. I used a tshirt material for my first go, which was ok but at some places holes were created where the pins were, or if I had to unpick so not ideal. I would say with this material an overlocker would hold the material in place better too on being worn. I used the E stitch for this pattern, and it was definitely a better choice than B which seemed to pull at the seams and create holes where the material had been sewn through. I think C would also be a good choice.
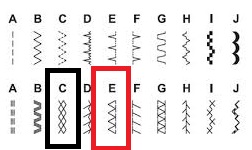 |
| E was my go to choice for the seams on this pattern |
To begin with I thought I would follow the instructions, but they are, well, limited. So with a bit of browsing around the internet I took the plunge, and decided to build it slightly differently. Here are my steps below.
- The first thing was to place the darts this involves matching the two lines together at the bottom of the top, and folding the dart towards the centre. Darting both the top and the legs at this point helps with understanding the direction of the darts and means less faffing during the putting everything together stage.
-
Once the darts were stitched in place across the bottom of the top I went onto the shoulders. These I stabilised with a bit of ribbon across the seams, following the instructions in the Tilly and the Buttons Stretch book - sorry I forgot to take a photo of this stage.
-
Neckband I had made a mistake here, in lengthening the body I totally forgot that I would need a longer neckband! I was lucky that I had (just) enough material to cut out a new neckband. I matched the notches to the shoulder seams and then put the band even to the end of the top. It needed stretching and pinning to fit the top properly. So to recap if you lengthen the body by and inch and do the same for the neckband.

Pinning the neckband - Rather than doing sleeves once the sides had been sewn I did mine as per the Tilly and Buttons Stretch book. So lying the bodice out flat and then laying the sleeves over the bodice matching notches. This worked out fine and I feel it is easier than trying to do them on the round.

Laying the sleeve against the bodice

flipping it ready to pin the sleeve against bodice - The waistband was a nightmare, when putting together with the legs - I went dramatically wonky (think 2.5cm in some places and 3.5 in others). So it ended up narrower than I wanted and still a bit wonky, so I bought an elastic belt to go around my waist. I also made a sparkly one for nights out! So my note to self for next time is draw lines for the seams on the inside of the band to follow to make sure the width is the same all the way around!

Pinning the waist band

How the top looks before going onto the legs - Legs, these were probably the easiest bit, and I followed the instructions with the pattern for this bit, simply lining up the inner leg seam and sewing down it.

Pinning the inside seam of legs - Pockets, again I followed the instructions with the pattern to build the pockets, they were easy to follow. I didn't have any see through elastic so I used normal 1/4inch elastic and that seems fine to me, as you can't see the elastic once you have finished all the steps. Once the pockets had been completed I sewed the outside leg seams and then (with one leg the right side out and the other wrong side out) put the legs inside each other (right sides together) to do the middle, crutch, seam.

Sewing the pockets - Now I had a top half and a bottom half, so they needed bringing together. Following the leg approach I put the right side of the top against the right side of the legs. I matched the seams and the darts and sewed around. This is where the wonky waistband happened :(

Fitting the bodice to the trousers - Hemming - I took of some of the length off the legs as they seemed very long on me, I rolled over once for approx 2 inches and then rolled again for 2.5 inches. For the sleeves I did a smaller hem, folding over once by 1cm as I wanted longer sleeves than on the pattern.

 |
| This is from the wrong side |


Final Thoughts
One thing I noted afterwards is by lengthening the body I really should have shortened the middle top of the trousers (probably around 2/3rds of the way down the pocket piece, and it feels like by approx 2 inches) as I had way too much material around the bottom of the bum and the front when I sat down. So my last note to self is Check the crutch length, it seems very long - shorten it, oh and maybe take an inch out of the side of the hips too!Update
So I tried a second version of this using similar material, without the top extension and it turned out a nightmare, I just couldn't get the cross over to work, or line up the darts without bunching. However the trousers fitted much better, so I was right with my final thoughts from my first make - the bodice was right to be lengthened, but I need to work out how to sort out the trousers part. Which is a shame. Still third time is a charm. I would say I have tried two now in plain colours and I do feel a bit like I am in my PJ's when I wear them, but that's not necessarily a bad thing, I do want to try something either patterned or in different material now.
Update part 2 FBA
I binned the whole thing about lengthening the bodice and went to FBA - and it worked! both top and bottom fitted perfectly. I am so happy right now :) I have now consided the first two I made to the "whoops better turn these into something else" and made two more D&D Siroccos with the FBA and get lots of compliments on them :D WIN! I am now making the playsuit version for summer, should it ever arrive.

Comments
Post a Comment